
Facial Expression Recognition using Sequential Model
- Mayukha Thumiki
- Mar 26, 2023
- 5 min read

Updated: Mar 26, 2023

Primary reference code: https://www.kaggle.com/datasets/samaneheslamifar/facial-emotion-expressions
Data flows sequentially through a number of layers or processing units in a neural network design known as a sequential model. This implies that, until the desired output is obtained, the output of one layer is sequentially feds as input to the next layer. The most common type of sequential model, and the one used in this project is the CNN (Convolutional Neural Network).
In our project, we have a dataset that consists of 28829 train images and 7066 validation images of human expression and our goal is to identify different expressions such as 'happy', 'sad', 'surprise', etc. from the image. For this purpose we make use of CNN model that is build using fully connected layers, convolutional layers and pooling layers. By applying a series of filters to the input picture, the convolutional layers extract features from the image. The feature maps are downsampled by the pooling layers, which lessens their processing complexity and size. The extracted features are then used by the fully connected layers to determine the class of the input image as shown.

Source: medium.com/techiepedia/binary-image-classifier-cnn-using-tensorflow-a3f5d6746697
This project deals with 'Keras' for CNN model and our progress is determined by considering validation accuracy and loss as the main parameters which is reflected in the historical training of the model.
Project Development:
Importing Libraries:
Let us get started on our first step which is importing the required libraries as shown. Most of them are the basic libraries such as 'numpy' and 'pandas' which are a must include in every Machine Learning project. (Read more at: www.geeksforgeeks.org/best-python-libraries-for-machine-learning/)

Understanding Dataset
The dataset has been downloaded from kaggle which consists of approximately 32,000 images including train and validation. Upon loading the data from the drive we learn that the data consists of 7 classes.

We then define the batch size and number of epochs that will be used later in the project.

The below code includes the process of creating dataframe which stores the address of the images and corresponding file name as the expression represented in the image.

This is how the train data would look like and the length of each dataset are as shown.


Some of the sample images from the validation dataset are show below.

Graphs representing the number of images in each class.

Encoding
Encoding is a process of converting categorical to numerical data and we use Label encoder and One hot encoder in this project. A scikit-learn utility class called LabelEncoder is used to encode categorical labels as numerical numbers. The goal variable in this instance is a categorical variable that has various class names, and we want to encode them as numerical values for use in machine learning models. This process converts the categorical categories into numerical values by fitting the encoder to the data.

The goal variable in a machine learning model—typically a neural network—can then be created using these one-hot encoded vectors. The neural network's output will also be a one-hot encoded vector, which, if required, can be transformed back into the initial class names using the inverse of to_categorical. The training dataset's "class_names" column is transformed into a one-hot encoded matrix using the to_categorical function in the first line of code, and the resulting matrix is then assigned to the train_labels variable. With each row substituted by its one-hot encoded vector representation, the result is a new array with the same number of rows as the training dataset. The validation dataset (valid_df) is treated similarly in the second line of code, and the outcome is then assigned to the variable valid_labels.

Model Building
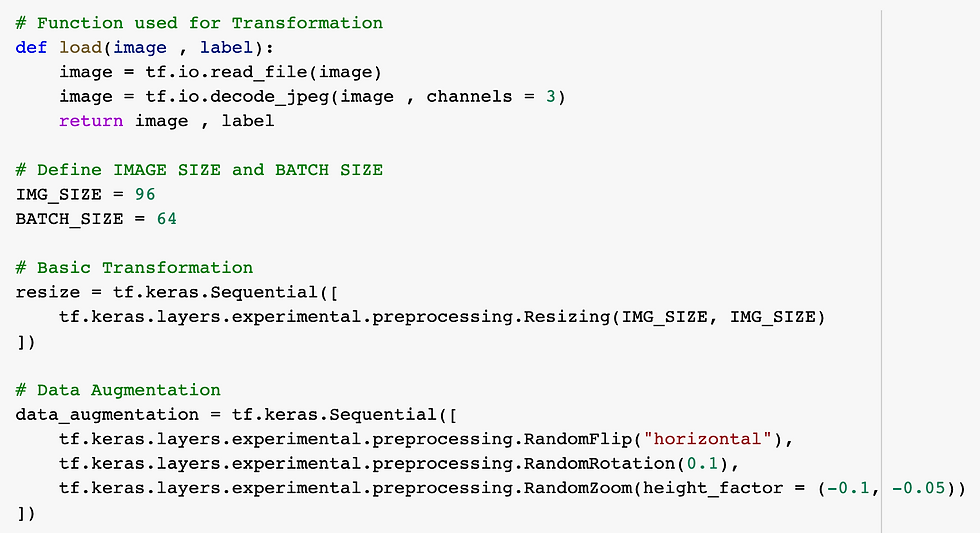
Before building the model, we should first make some changes to the dataset that would make it ready to fit our model.
By enhancing the variety and diversity of the training data, this method for data augmentation makes the model more resilient to changes in the input data. By creating new data from the old data, it also helps avoid overfitting. The next line of code creates two variables: IMG_SIZE, which defines the height of the image after resizing, and BATCH_SIZE, which establishes the quantity of images to be processed in a batch. The following step is to construct an important modification using tf.keras.consecutive experimental preprocessing and tf keras layers.Resizing. The Resizing layer scales the image to the required proportions using bilinear interpolation. tf.keras.Sequential and the three preprocessing layers RandomFlip, RandomRotation, and RandomZoom are used to define data augmentation in the final step. These layers arbitrarily flip the input images horizontally, rotate them by 0.1 radians, and zoom them with height factors that range from -0.1 to -0.05.
The TensorFlow dataset object created by this method can be used to train a deep learning model. In order to create new data and avoid overfitting, it employs data augmentation methods during training. Additionally, it shuffles the data to make sure the model sees various instances at different points in time. Using the tf.convert_to_tensor method, the lists of paths and labels are first transformed into tensor objects. The function then uses tf.data to generate two datasets.The images and their names are in the dataset.from_tensor_slices. It then uses tf.data to combine these two datasets together.Dataset.zip. The dataset is then shrunk, resized, and augmented (only for train data) to produce various potential data.

We call this method for both train and validation data to create variable 'train_dataset' and 'valid_dataset' which will be fit to the model. We can also load the image by inverse transforming from the dataset for our verification purpose.

The existing 'CNN' Model
This model architecture is created to make use of the pre-trained EfficientNetB2 backbone to extract significant features from the input pictures, which are then used to classify the images into one of the 7 classes. The model's extra layers serve to improve the classification performance and fine-tune feature extraction.
Using EfficientNetB2 as its foundation, this code creates a deep learning model. On numerous computer vision tasks, the EfficientNetB2 model, which has been pre-trained on a sizable dataset, has shown state-of-the-art results.
The 96x96 input pictures with three color channels are specified by the input_shape parameter. Since the include_top parameter is set to False, the model does not contain the topmost completely connected layer.
The model architecture is defined using tf.keras.Sequential in the following phase.
A Conv2D layer with 128 filters, a 3x3 kernel size, and "same" padding is applied as the second layer after the backbone model. The output's geographic dimensions are then condensed to a single vector by a GlobalAveragePooling2D layer.
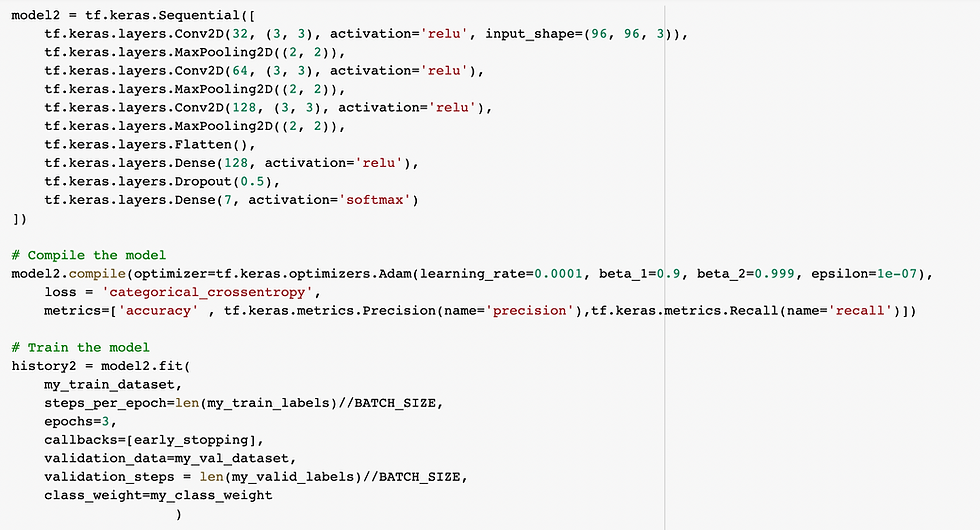
With 128 units and "relu" activation, the following layer is a dense layer that is completely connected. Then, in order to avoid overfitting, a dropout layer with a dropout rate of 0.3 is introduced. The final layer, a Dense layer with 7 units (since there are 7 groups in the dataset), produces a probability distribution over the 7 classes.

Accuracy, precision, and recall measures are used to assess performance. While precision and recall measure the model's capacity to accurately identify positive cases and capture all positive cases, respectively, accuracy measures the percentage of images that are correctly classified.
'Adam', a well-liked deep learning optimizer, is the optimizer employed in this situation. These parameters are assigned to particular values: learning_rate, beta_1, beta_2, and epsilon.
Categorical_crossentropy, a frequently used option for multi-class categorization issues, is the loss function used.

If specific criteria are satisfied, training can be terminated early using the Keras function EarlyStopping. One way to manage data overfitting fitting is through this technique.

This is the code using which the model was trained and the results obtained are:

Epoch 1/12 450/450 [==============================] - 383s 830ms/step - loss: 1.2381 - accuracy: 0.8316 - precision: 0.8678 - recall: 0.7881 - val_loss: 16.7374 - val_accuracy: 0.1425 - val_precision: 0.1425 - val_recall: 0.1425 Epoch 2/12 450/450 [==============================] - 375s 835ms/step - loss: 1.3627 - accuracy: 0.8326 - precision: 0.8777 - recall: 0.7764 - val_loss: 11.4976 - val_accuracy: 0.1418 - val_precision: 0.1418 - val_recall: 0.1418
This Indicates that the model is overfit because the training accuracy is approx. 80 percent as compared to validation accuracy which is around 14 percent.
MY CONTRIBUTION:
According to my ideology, improvement in this project starts from step one i.e. making changes in the data that includes changes in encoding, data augmentation, hyper parameters tuning and finally the model itself.
Modification to Frequency Encoding
I have used a modified version of frequency encoding in place of label encoding and inverse label transformation. When a categorical variable has many categories or there is a considerable effect of rare categories on the model as in this model, where there are very few images of disgust and more number of happy, frequency encoding can be a helpful method for encoding the variable. We are assigning the highest number to category with highest number of images and the class probability of this will be higher while fitting the model.


Data Augmentation
Added three extra layers for contrast, cropping and translation.
Up to 10% of the image's contrast is arbitrarily adjusted by the function RandomContrast(factor=0.1).
The picture is randomly cropped to 96x96 using the RandomCrop(height=96, width=96) function.
The image is randomly translated by up to 10% in height and breadth using the functions RandomTranslation(height_factor=(-0.1, 0.1), width_factor=(-0.1, 0.1)).

New Model design
Original model:
In the very beginning we fit our dataset to the already existing model built using 'EfficientNetB2' and provided by Samaneh Eslamifar in the kaggle and 'history1' stores the performance of the model which is also depicted by the epochs history below the code.

Epoch 2/2 450/450 [==============================] - 107s 237ms/step - loss: 1.3703 - accuracy: 0.8317 - precision: 0.8671 - recall: 0.7835 - val_loss: 15.8298 - val_accuracy: 0.1428 - val_precision: 0.1428 - val_recall: 0.1428
My model
I have built a model similar to the previous one and makes changes including removal of inbuilt 'EfficientNetB2' and adding complexity to the layers. But the validation accuracy did not improve significantly however, the validation loss changed to around 9 percent.
450/450 [==============================] - 78s 165ms/step - loss: 2.3080 - accuracy: 0.8189 - precision: 0.8546 - recall: 0.7852 - val_loss: 8.5437 - val_accuracy: 0.1426 - val_precision: 0.1427 - val_recall: 0.1426
Improvement to previous model:
The results of the first layer are normalized in the second layer, which is a batch normalization layer.
The output of the first layer is compressed spatially in the third layer, which is a max pooling layer with a pool capacity of 2x2.
The fourth layer is a second 2D convolutional layer with 1024 3x3 filters, followed by the same padding and a hyperbolic tangent (tanh) activation function.
Another 2D convolutional layer with 128 3x3 filters makes up the fifth layer, which is followed by a ReLU activation function.
A group normalization layer is the sixth layer.
Another 2D convolutional layer with 256 3x3 filters makes up the seventh layer, which is then followed by the same padding and a ReLU activation function.
Batch normalization is the ninth layer.
Another 2D convolutional layer with 256 3x3 filters makes up the ninth layer, which is then followed by the same padding and a ReLU activation function.
Batch normalization layer is the eleventh layer.
Another 2D convolutional layer with 512 filters of size 3x3, a ReLU activation function, and the same padding make up the eleventh layer.
The preceding layer's output's spatial size is decreased by the twelfth layer, a max pooling layer with a pool size of 2x2.
Another 2D convolutional layer with 1024 3x3 filters makes up the thirteenth layer. It is followed by a ReLU activation function and the same padding.
A group normalization layer is the fourteenth layer.
Another 2D convolutional layer with 1024 3x3 filters makes up the sixteenth layer. It is followed by the same padding and a ReLU activation function.
A batch normalization layer is the seventeenth layer.
Another 2D convolutional layer with 1024 3x3 filters makes up the seventeenth layer. It is followed by the same buffer and a sigmoid activation function.
Another 2D convolutional layer with 1024 3x3 filters makes up the 18th layer. It is followed by the same buffer and the hyperbolic tangent (tanh) activation function.
Another 2D convolutional layer with 1024 3x3 filters makes up the nineteenth layer, which is then followed by the same padding and a LeakyReLU activation function.
The spatial size of the output from the preceding layer is decreased because the twentieth layer is a max pooling layer with a pool size of 2x2.


The epochs history is-
Epoch 2/5 225/225 [==============================] - 279s 1s/step - loss: 4.1149 - accuracy: 0.8093 - precision: 0.4211 - recall: 0.0061 - val_loss: 1.9119 - val_accuracy: 0.4972 - val_precision: 0.4972 - val_recall: 0.4972
Effect of Data Augmentation:
The model4 is same as model3 with few changes including-
Model 4 has a data augmentation layer at the model's outset that uses random image transformations to expand the dataset.
In order to avoid overfitting, Model 4 has a third Dropout layer placed between the final two Dense layers.
Following the final convolutional layer in Model 4, there is an extra batch normalization layer that aids in normalizing the inputs of the following layer.
Prior to the initial MaxPooling2D layer, Model 4 has a second Conv2D layer with 512 filters and ReLU activation.


Epoch 3/3 225/225 [==============================] - 679s 3s/step - loss: 1.0277 - accuracy: 0.8038 - precision: 0.8381 - recall: 0.7646 - val_loss: 2.9106 - val_accuracy: 0.5017 - val_precision: 0.5020 - val_recall: 0.5011
The below is the line graph that shows how the accuracy has improved by increasing the complexity.

Performance Comparison
The below table records the performances of all the models.
Performance parameters | Training Accuracy | Validation Accuracy | Validation loss |
Model 1 | 0.8317 | 0.1428 | 0.7835 |
Model 2 | 0.8189 | 0.1428 | 8.5437 |
Model 3 | 0.8093 | 0.4972 | 1.9119 |
Model 4 | 0.8038 | 0.5017 | 2.9106 |
As we can see that the highest accuracy was recorded by Model 4. While the model designed by Samaneh Eslamifar which includes 'EfficientNetB2' has an accuracy of 0.14, I have improved it to 0.50 by using frequency encoder in place of label encoder that prioritizes the classes that has high number of images, changes in data augmentation and the model itself.
Challenges and future work:
Overfitting Problem: I had faced this problem while using the 'EfficientNetB2' and tried to over come this to some extent by adding batch normalization and dropout layers in between the Conv2D layers. I had performed L2 regularization for controlling overfitting of data

I have performed early stopping that stops running more epochs if two performances are the same

Normalization of Images: It helps in understanding the features better and helps improve accuracy to a notable extent. Below is the code for normalization implemented on 6 images from train dataset.

However, this has not been implemented in the code due to the bulky nature of image data and the time taken by the process to normalize all the images of train and validation data. I would like to continue work in this to implement in the future.
Link to the code:
References:
https://www.kaggle.com/datasets/samaneheslamifar/facial-emotion-expressions
https://towardsdatascience.com/all-about-categorical-variable-encoding-305f3361fd02
https://www.tensorflow.org/api_docs/python/tf/keras/layers/RandomContrast
https://www.tensorflow.org/api_docs/python/tf/keras/layers/RandomCrop
https://www.tensorflow.org/api_docs/python/tf/keras/layers/RandomTranslation
https://www.geeksforgeeks.org/adding-value-labels-on-a-matplotlib-bar-chart/


Comments